The Ultimate Coffee Lover’s Cheesecake Recipe
Introduction
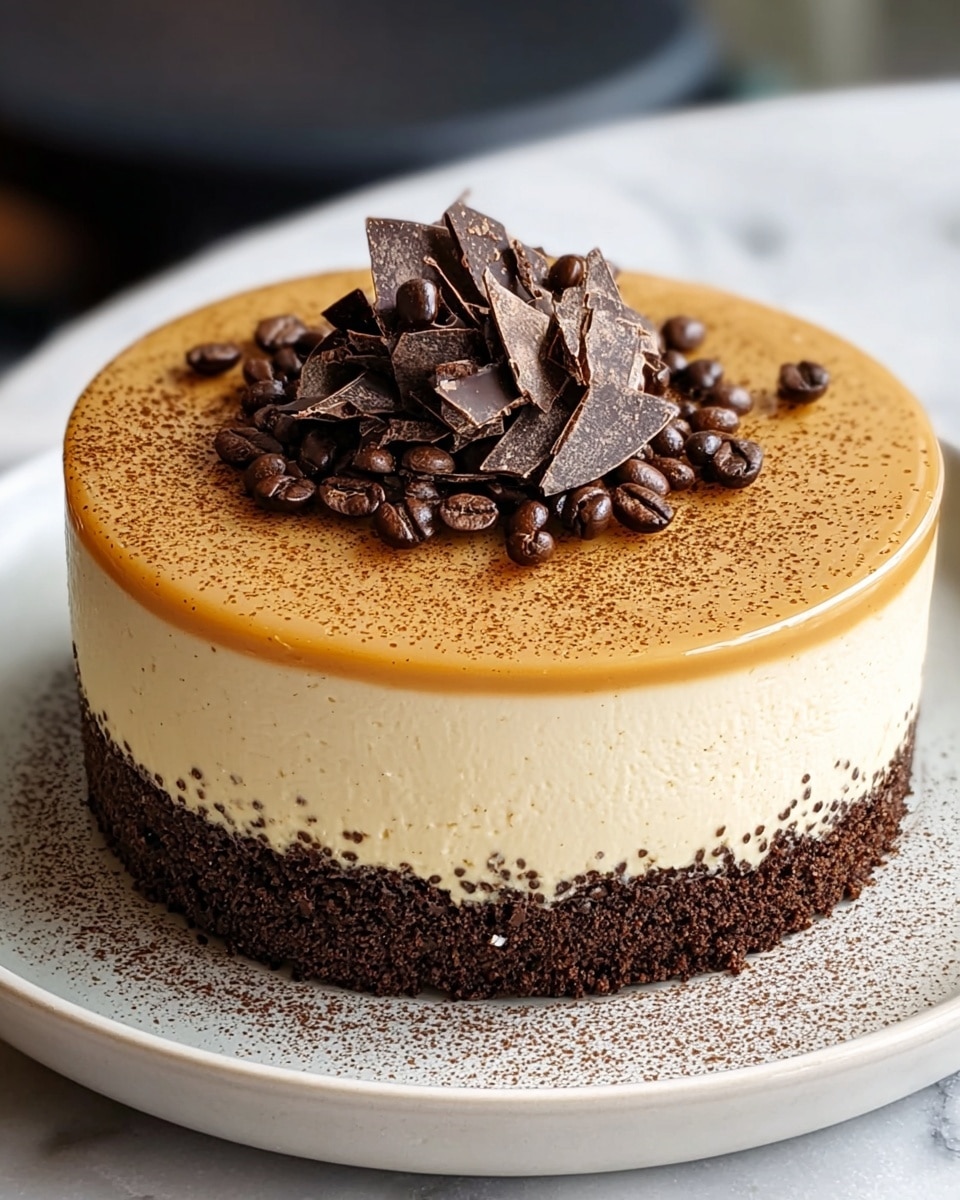
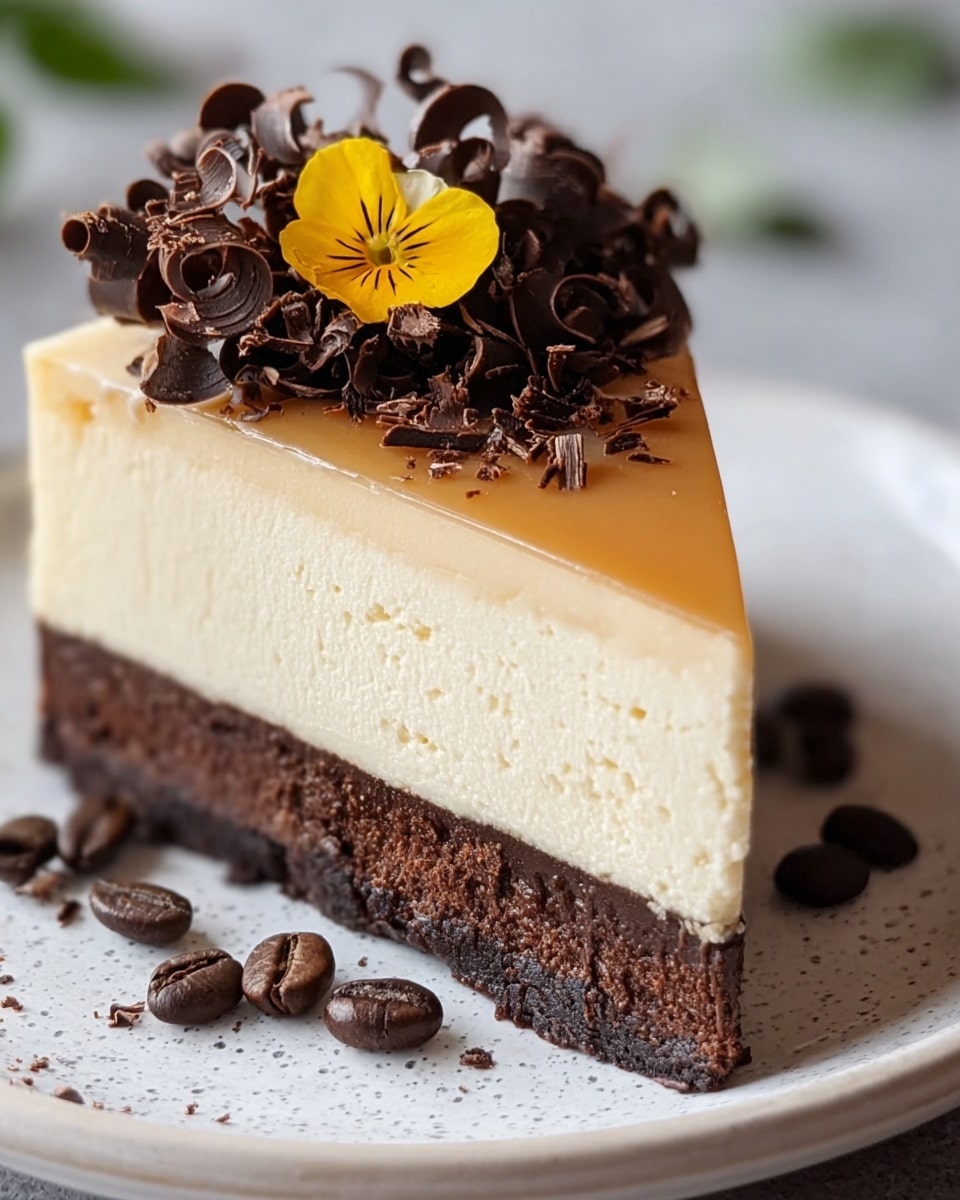
This Ultimate Coffee Lover’s Cheesecake combines rich cream cheese with bold espresso for a decadent dessert. It has a chocolatey graham cracker crust and a smooth, coffee-flavored filling that’s perfect for any occasion.
Ingredients
- 2 cups graham cracker crumbs
- 1/2 cup unsweetened cocoa powder
- 1/2 cup brown sugar
- 1/2 cup unsalted butter, melted
- 3 (8 oz) packages cream cheese, softened
- 1 cup granulated sugar
- 1 teaspoon vanilla extract
- 3 large eggs
- 1 cup brewed espresso or strong coffee, cooled
- 1/4 cup coffee liqueur (optional)
- 1/4 teaspoon salt
- Chocolate shavings or coffee beans for garnish (optional)
Instructions
- Step 1: Preheat your oven to 325°F (160°C).
- Step 2: In a medium bowl, combine graham cracker crumbs, cocoa powder, brown sugar, and melted butter. Mix well and press into the bottom of a 9-inch springform pan to form an even crust. Bake for 10 minutes, then let cool.
- Step 3: In a large mixing bowl, beat softened cream cheese with an electric mixer on medium speed until smooth and creamy.
- Step 4: Gradually add granulated sugar while mixing. Then add vanilla extract and salt, mixing until fully incorporated.
- Step 5: Add eggs one at a time, mixing on low speed after each just until combined. Avoid overmixing.
- Step 6: Slowly pour in cooled espresso and coffee liqueur if using. Mix until smooth and lump-free.
- Step 7: Pour cheesecake filling over the cooled crust, smoothing the top with a spatula.
- Step 8: Bake for 55-60 minutes until edges are set but center still slightly jiggles. Turn off oven, crack the door, and let cheesecake cool inside for 1 hour.
- Step 9: Refrigerate the cheesecake for at least 4 hours, preferably overnight, for best flavor and texture.
- Step 10: Remove carefully from springform pan, garnish with chocolate shavings or coffee beans if desired, slice, and serve chilled.
Tips & Variations
- Use freshly brewed espresso for the richest coffee flavor; instant coffee can be a substitute in a pinch.
- Add a tablespoon of instant coffee granules to the crust for an extra coffee kick.
- For a boozy twist, feel free to increase coffee liqueur slightly or omit it for a non-alcoholic version.
- Ensure cream cheese is fully softened to avoid lumps in the batter.
- Wrap the cooled cheesecake in plastic wrap before refrigerating to prevent it from drying out.
Storage
Store the cheesecake covered in the refrigerator for up to 5 days. For longer storage, freeze the cheesecake tightly wrapped for up to 2 months. Thaw overnight in the refrigerator before serving. Reheat is not recommended; serve chilled for the best texture and flavor.
How to Serve
Serve this delicious recipe with your favorite sides.
FAQs
Can I use regular brewed coffee instead of espresso?
Yes, strong brewed coffee works well, though espresso will provide a more intense coffee flavor. Just make sure the coffee is cooled before adding it to the batter.
How do I prevent cracks on the cheesecake surface?
Baking the cheesecake gently at a lower temperature and letting it cool slowly in the turned-off oven with the door ajar helps prevent cracks. Also, avoid overmixing the batter and don’t overbake—slight jiggle in the center is perfect.
PrintThe Ultimate Coffee Lover’s Cheesecake Recipe
This Ultimate Coffee Lover’s Cheesecake recipe combines the rich, creamy texture of classic cheesecake with the bold, aromatic flavors of espresso and coffee liqueur. Featuring a chocolatey graham cracker crust infused with cocoa powder and brown sugar, this dessert is perfect for coffee enthusiasts seeking an indulgent, sophisticated treat. Baked to perfection and chilled for optimal flavor, it’s garnished with chocolate shavings or coffee beans for an elegant finish.
- Prep Time: 20 minutes
- Cook Time: 1 hour 10 minutes
- Total Time: 5 hours 30 minutes
- Yield: 12 servings 1x
- Category: Dessert
- Method: Baking
- Cuisine: American
Ingredients
Crust
- 2 cups graham cracker crumbs
- 1/2 cup unsweetened cocoa powder
- 1/2 cup brown sugar
- 1/2 cup unsalted butter, melted
Filling
- 3 (8 oz) packages cream cheese, softened
- 1 cup granulated sugar
- 1 teaspoon vanilla extract
- 3 large eggs
- 1 cup brewed espresso or strong coffee, cooled
- 1/4 cup coffee liqueur (optional)
- 1/4 teaspoon salt
Garnish (Optional)
- Chocolate shavings or coffee beans
Instructions
- Preheat the Oven: Preheat your oven to 325°F (160°C) to prepare for baking the cheesecake.
- Prepare the Crust: In a medium bowl, combine the graham cracker crumbs, cocoa powder, brown sugar, and melted butter until well mixed. Press the mixture evenly into the bottom of a 9-inch springform pan to form the crust. Bake for 10 minutes, then let it cool.
- Beat the Cream Cheese: In a large mixing bowl, beat the softened cream cheese with an electric mixer on medium speed until smooth and creamy, ensuring no lumps remain.
- Add Sugar and Flavor: Gradually mix in the granulated sugar, then add vanilla extract and salt. Continue to mix until everything is fully incorporated and smooth.
- Incorporate the Eggs: Add eggs one at a time, mixing on low speed after each addition just until combined, being careful not to overmix to avoid cracks during baking.
- Mix in Coffee: Slowly pour the cooled espresso and optional coffee liqueur into the cream cheese mixture. Blend gently until smooth and creamy, ensuring an even coffee flavor throughout.
- Assemble the Cheesecake: Pour the coffee-flavored cheesecake filling over the cooled crust in the springform pan. Smooth the top evenly with a spatula for a clean finish.
- Bake the Cheesecake: Bake in the preheated oven for 55-60 minutes, until the edges are set and the center is slightly jiggly. Turn off the oven, crack the oven door, and allow the cheesecake to cool slowly inside for about 1 hour to prevent cracking.
- Chill: Remove the cheesecake from the oven and refrigerate it for at least 4 hours, preferably overnight. This chilling step helps develop the flavors and firm up the texture.
- Serve: Carefully remove the sides of the springform pan. Garnish with chocolate shavings or coffee beans if desired. Slice and serve chilled to enjoy the rich coffee-infused decadence.
Notes
- Using room temperature cream cheese ensures a smooth and lump-free batter.
- Allow the espresso or coffee to cool completely to prevent curdling the eggs during mixing.
- The coffee liqueur is optional but adds a deeper coffee flavor and richness.
- Slowly cooling the cheesecake in the oven after baking helps prevent cracks on the surface.
- Refrigerate overnight for best texture and flavor development.
- If you don’t have a springform pan, line a regular cake pan with parchment paper to facilitate removal.
Keywords: Coffee cheesecake, espresso cheesecake, coffee dessert, chocolate crust cheesecake, creamy cheesecake recipe, coffee liqueur cheesecake