Easy Chocolate Peppermint Cookies Recipe
Introduction
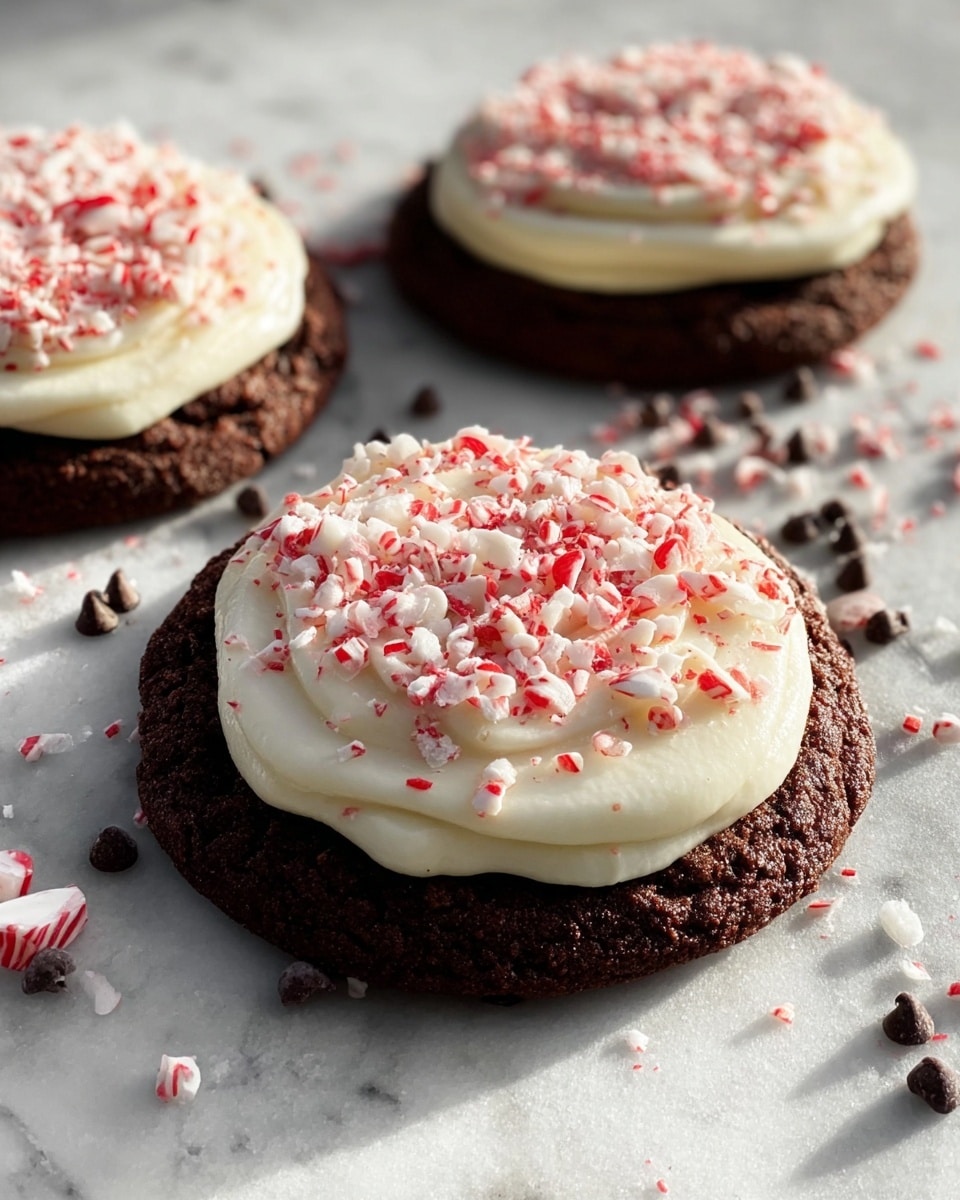
These Easy Chocolate Peppermint Cookies combine rich cocoa and melty chocolate chips with a creamy peppermint frosting for a festive treat. Soft, chewy, and bursting with flavor, they’re perfect for holiday gatherings or any time you crave a minty chocolate delight.
Ingredients
- 2⅓ cups all-purpose flour (spooned and leveled)
- ½ cup unsweetened cocoa powder
- ¾ teaspoon baking soda
- ¼ teaspoon baking powder
- 1 cup salted butter (softened)
- 1 cup light brown sugar (packed)
- ⅔ cup granulated sugar
- 2 large eggs
- 1½ teaspoons vanilla extract
- 1⅓ cups semi-sweet chocolate chips
- ½ cup salted butter (softened) for frosting
- 2½ to 3 cups powdered sugar (sifted)
- 8 oz cream cheese (softened)
- ⅓ teaspoon peppermint extract
- Crushed candy canes (for garnish)
Instructions
- Step 1: Preheat your oven to 350°F (175°C) and line a baking sheet with parchment paper to prevent sticking and make cleanup easier.
- Step 2: In a large bowl, beat the salted butter, light brown sugar, and granulated sugar together until the mixture is fluffy and creamy. Scrape the sides of the bowl to ensure even mixing.
- Step 3: Add the eggs one at a time, mixing well after each, then stir in the vanilla extract until the batter is smooth and glossy.
- Step 4: In another bowl, sift together the flour, cocoa powder, baking soda, and baking powder. Gradually fold the dry ingredients into the wet mixture, being careful not to overmix. Fold in the chocolate chips last.
- Step 5: Scoop generous portions of dough onto the prepared baking sheet, leaving space between each cookie to allow for spreading.
- Step 6: Bake for about 9 minutes until the edges are set but the centers still jiggle slightly. Let cookies rest on the tray for a few minutes before transferring to a wire rack to cool completely.
- Step 7: To make the frosting, beat the cream cheese and softened butter together until smooth and silky.
- Step 8: Add the powdered sugar and peppermint extract, mixing until the frosting is light and fluffy. If the frosting is too soft to spread, chill it in the fridge for 10 minutes.
- Step 9: Spread a generous layer of frosting on each cooled cookie and sprinkle with crushed candy canes for a festive touch.
Tips & Variations
- Use high-quality cocoa powder and chocolate chips for the richest flavor.
- For a stronger peppermint taste, add a little more peppermint extract, but be careful not to overpower the chocolate.
- Try substituting crushed peppermint candies with mini chocolate chips or chopped nuts for different textures.
- Chilling the dough before baking can help keep the cookies thick and chewy.
Storage
Store the frosted cookies in an airtight container in the refrigerator for up to 5 days. Bring them to room temperature before serving for the best texture. You can also freeze unfrosted cookies for up to 3 months; thaw completely and frost before serving.
How to Serve

Serve this delicious recipe with your favorite sides.
FAQs
Can I make these cookies dairy-free?
You can substitute the butter and cream cheese with dairy-free alternatives, such as plant-based margarine and dairy-free cream cheese, to make these cookies dairy-free.
How do I prevent the cookies from spreading too much?
Make sure your butter is softened but not melted, and avoid overmixing the dough. You can also chill the dough for 30 minutes before baking to help the cookies hold their shape better.
PrintEasy Chocolate Peppermint Cookies Recipe

These Easy Chocolate Peppermint Cookies are a delightful holiday treat combining rich cocoa, melty chocolate chips, and a creamy peppermint frosting topped with crushed candy canes. Soft and chewy with a refreshing minty twist, they’re perfect for festive celebrations or a cozy winter snack.
- Prep Time: 20 minutes
- Cook Time: 9 minutes
- Total Time: 40 minutes
- Yield: 24 cookies 1x
- Category: Dessert
- Method: Baking
- Cuisine: American
Ingredients
Cookie Dough
- 2⅓ cups all-purpose flour (spooned and leveled)
- ½ cup unsweetened cocoa powder
- ¾ teaspoon baking soda
- ¼ teaspoon baking powder
- 1 cup salted butter (softened)
- 1 cup light brown sugar (packed)
- ⅔ cup granulated sugar
- 2 large eggs
- 1½ teaspoons vanilla extract
- 1⅓ cups semi-sweet chocolate chips
Frosting
- ½ cup salted butter (softened)
- 8 oz cream cheese (softened)
- 2½ to 3 cups powdered sugar (sifted)
- ⅓ teaspoon peppermint extract
- Crushed candy canes (for garnish)
Instructions
- Preheat the oven: Preheat your oven to 350°F (175°C) and line a baking sheet with parchment paper to prevent sticking and ensure easy cleanup.
- Make the dough base: In a large bowl, combine the softened salted butter, light brown sugar, and granulated sugar. Beat together until the mixture is fluffy, creamy, and fully combined, scraping the bowl sides frequently for an even texture.
- Add eggs and vanilla: Beat in the eggs one at a time, then add the vanilla extract. Mix until the batter is glossy and smooth.
- Combine dry ingredients: In a separate bowl, sift together the all-purpose flour, unsweetened cocoa powder, baking soda, and baking powder.
- Mix wet and dry: Gradually fold the sifted dry ingredients into the wet mixture gently, avoiding overmixing to maintain tender cookies.
- Add chocolate chips: Fold in the semi-sweet chocolate chips evenly throughout the dough.
- Scoop and bake: Drop generous portions of dough onto the prepared baking sheet, leaving space between cookies for spreading. Bake for about 9 minutes, until edges are set but centers still jiggle slightly for soft chewiness.
- Cool the cookies: Let the cookies rest on the baking sheet for a few minutes, then transfer them to a wire rack to cool completely.
- Prepare frosting: While cookies cool, beat together the softened cream cheese and salted butter until smooth and silky.
- Add powdered sugar and peppermint: Incorporate the sifted powdered sugar and peppermint extract, mixing until light, fluffy, and minty. Chill for 10 minutes if frosting is too soft for spreading.
- Frost and garnish: Once cookies are fully cooled, spread a generous layer of peppermint frosting on each cookie and sprinkle crushed candy canes on top for festive crunch and decoration.
Notes
- Do not overbake the cookies; they should be soft and chewy with slightly jiggly centers.
- Ensure butter and cream cheese are softened for smooth frosting consistency.
- Sift powdered sugar before adding to frosting for a lump-free texture.
- Store cookies in an airtight container at room temperature for up to 4 days or refrigerate for longer freshness.
- Crushed candy canes add festive flavor and crunch but can be omitted for a softer topping.
Keywords: Chocolate Peppermint Cookies, Holiday Cookies, Peppermint Frosting, Soft Chocolate Cookies, Christmas Cookies