Easy Dutch Oven No-Knead Bread Recipe
Introduction
This easy Dutch Oven No Knead Bread is a simple, rustic loaf with a crisp crust and soft, airy interior. It requires minimal effort and no kneading, making it perfect for home bakers seeking delicious fresh bread without the fuss.
Ingredients
- 3 cups all-purpose flour
- 2 teaspoons active dry yeast
- 1 ½ teaspoons sea salt
- 1 ½ cups warm water (105 degrees F)
Instructions
- Step 1: In a large bowl, combine the flour, yeast, and salt. Stir the ingredients together evenly.
- Step 2: Add the warm water and mix until the dough forms a loose ball.
- Step 3: Cover the bowl with plastic wrap sprayed lightly with cooking spray, then place a damp tea towel over it. Let the dough rise at room temperature for 18 to 24 hours.
- Step 4: At least one hour before baking, preheat your oven to 450 degrees F. Place a 2 3/4 quart Dutch oven with its lid in the oven to heat up. Note: a 5 quart Dutch oven works well too.
- Step 5: While the oven preheats, gently turn the dough onto a floured surface. Shape it into a ball, adding a few tablespoons of flour if needed. The dough should remain slightly loose and floppy. Cover this dough ball with a floured towel while the oven finishes heating.
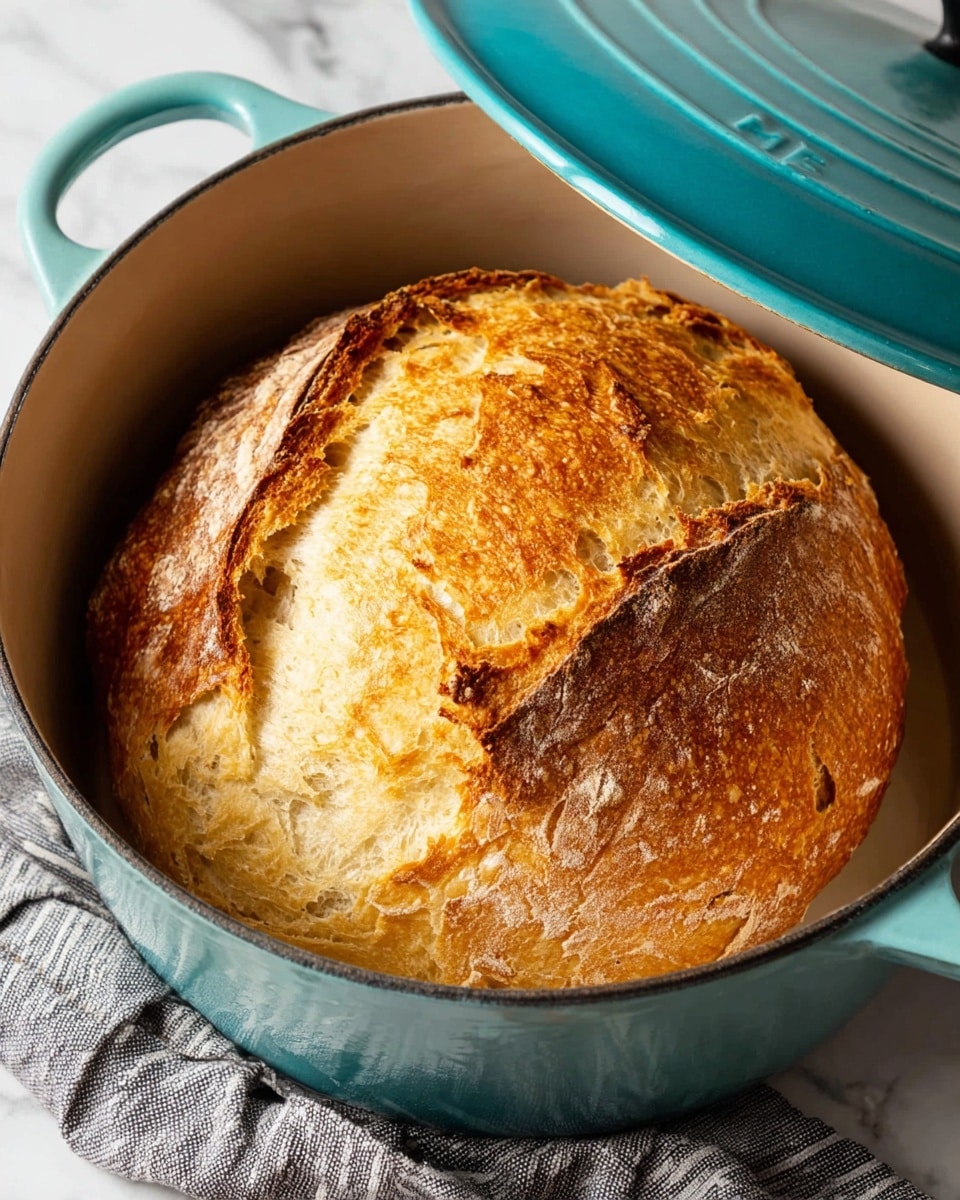
- Step 6: Carefully remove the hot Dutch oven from the oven. Remove the lid, spray the inside with cooking spray or line it with parchment paper.
- Step 7: Place the dough ball inside the Dutch oven, spreading it evenly.
- Step 8: Cover with the lid and bake for 30 minutes. Then remove the lid and bake for an additional 15 minutes until the bread turns golden brown.
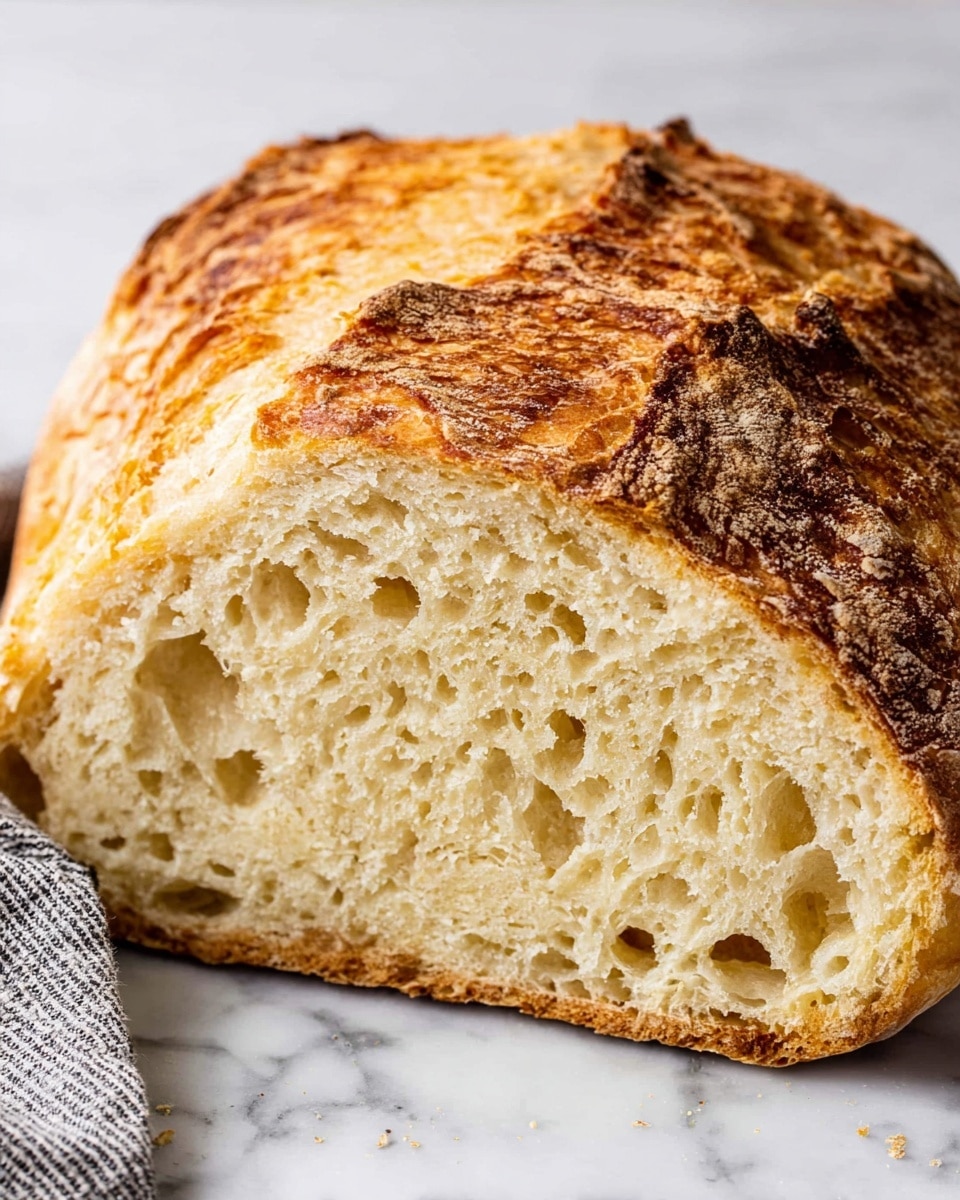
- Step 9: Remove the bread from the Dutch oven and cool on a wire rack before slicing. To keep the bread warm, cover it with a tea towel.
Tips & Variations
- Use bread or all-purpose flour for best texture; whole wheat can make the bread denser.
- Adding herbs or garlic powder to the dough creates a flavorful twist.
- For a crisper crust, leave the bread uncovered while cooling.
- Try using parchment paper to easily lift the dough into the Dutch oven.
Storage
Store leftover bread at room temperature in a paper bag or wrapped loosely in a tea towel to maintain crustiness for up to two days. For longer storage, freeze the bread wrapped tightly in plastic wrap and foil for up to three months. Reheat in the oven at 350 degrees F for 10-15 minutes to refresh the crust.
How to Serve
Serve this delicious recipe with your favorite sides.
FAQs
Do I need to knead the dough for this recipe?
No kneading is required. The long resting time allows gluten development, resulting in a chewy texture without kneading.
Can I use a different size Dutch oven?
Yes, a 5 quart Dutch oven works well. The bread may spread differently, so adjust shaping accordingly.
PrintEasy Dutch Oven No-Knead Bread Recipe

This Easy Dutch Oven No Knead Bread recipe produces a moist, golden brown, and irresistibly soft loaf with minimal effort. Using simple ingredients and a slow fermentation process, this method requires no kneading and uses a Dutch oven to create a perfect crust and crumb, ideal for beginner bakers and seasoned bread lovers alike.
- Prep Time: 15 minutes
- Cook Time: 45 minutes
- Total Time: 19 to 24 hours (including fermentation)
- Yield: 1 loaf (approximately 8-10 servings) 1x
- Category: Bread
- Method: Baking
- Cuisine: American
- Diet: Vegetarian
Ingredients
Dry Ingredients
- 3 cups all-purpose flour
- 2 teaspoons active dry yeast
- 1 ½ teaspoons sea salt
Wet Ingredients
- 1 ½ cups warm water (105 degrees F)
Instructions
- Mix Dry Ingredients: In a large bowl, combine the all-purpose flour, active dry yeast, and sea salt. Stir well to ensure even distribution of ingredients.
- Add Water and Form Dough: Pour in the warm water and mix until the dough pulls together into a loose ball. The dough should be wet and sticky, not firm.
- First Rise: Cover the bowl with plastic wrap that has been sprayed with cooking spray, then place a damp tea towel over it. Let the dough sit at room temperature, undisturbed, for 18 to 24 hours to allow fermentation and flavor development.
- Preheat Oven and Dutch Oven: At least one hour before serving, preheat your oven to 450°F (232°C). Place a 2 ¾ quart Dutch oven (or similarly sized oven-safe pot with a lid) inside to heat up.
- Shape Dough: Transfer the dough onto a floured surface. Using floured hands, gently form it into a ball, adding a bit of flour if it’s too sticky. The dough will remain loose and floppy, which is expected for this moist bread. Cover it with a floured towel while the oven preheats.
- Prepare Dutch Oven: Carefully remove the hot Dutch oven from the oven. Remove the lid and either spray the interior with cooking spray or line it with parchment paper to prevent sticking.
- Bake Covered: Place the dough ball into the Dutch oven so it’s evenly spread out. Cover with the lid and bake in the oven for 30 minutes to trap steam and develop the crust.
- Bake Uncovered: Remove the lid and continue baking for an additional 15 minutes or until the bread is a deep golden brown and crusty.
- Cool the Bread: Carefully remove the bread from the Dutch oven and place it on a cooling rack. Let it cool completely or cover with a tea towel to keep warm before slicing.
Notes
- The dough is intentionally very moist and sticky; avoid adding too much extra flour or the bread may become dense.
- You can use a 5-quart Dutch oven if that’s what you have; the recipe scales well to this size.
- Allowing the dough to ferment for 18 to 24 hours develops flavor and improves texture but can be adjusted down to 12 hours if pressed for time.
- Make sure the water temperature is about 105°F to keep yeast active without killing it.
- For easy cleanup, lining the Dutch oven with parchment paper is highly recommended.
- Let the bread cool properly before slicing to prevent a gummy crumb.
Keywords: no knead bread, Dutch oven bread, easy bread recipe, homemade bread, artisan bread, no knead yeast bread